

Tuesday, 29 January 2013
Postcard Competition
Last year i entered a free Postcard competition run by St Cuthberts Mill who make Saunders Waterford watercolour paper. On Saturday a parcel arrived for me and this was in it:
 I got runners up! and won the block of paper in the pic!!!! This competition runs every other year and last time i got runners up too. I am so happy that my paintings were thought of as good, it gives me such a lift :)

Sunday, 13 January 2013
Lil' Brown Dragon
At long last i have been able to sit down in the craft room and work on something for myself. Don't get me wrong i do enjoy making things for my shops, but in the run up to Christmas it was all i was doing and its nice to do something for different for a change :)
 Here he is, 2 inches high made from Fimo, and my first time ever using a tinfoil armature. However its apparent i did not compact the tinfoil enough as underneath he has a spilt where the air inside has expanded in the cooking process, but its not noticeable when he's sitting on my desk.
 I used a tutorial by the very talented Becca Golins.
 Penny for size reference.


Wednesday, 2 January 2013
Christmas Presents
Here are all the sewing projects i was working on for Christmas but couldn't blog them as they were gifts :)
 Zippered bag and purse, with a label!


Inside (tissue paper to help the bag keep shape)
Different fabric

 And another bag this time with butterflies.
 And another cushion with piping! i got the technique down with this cushion ;)
 and i am getting better at sewing zips in! Yay me!


Inside (tissue paper to help the bag keep shape)
Different fabric


 And another cushion with piping! i got the technique down with this cushion ;)
Thursday, 20 December 2012
Blackboard Cup
 Since seeing a few tutorials of Cheese boards and mugs painted with Pebeo's Porcelaine Blackboard paint, i have been dying to find some and try it. The internet wasn't being very helpful in locating some so i ordered this mug kit from my art shop.
This is the result, i have only applied two coats not sure if i should do three and it hasn't been baked yet so in theory i could wash it off and start again. I am pleased with it and it now serves as a little calender on my desk :)
Wednesday, 12 December 2012
Piping
Due to working on Christmas presents i have been unable to blog about what i have been making, however i have managed today to work on something for myself:
 Another cushion!, but this time i have put piping around the edges. I have never done anything with piping before so this was an experiment and i am really pleased with the result and i did go wonky a few times but i am really happy with it.
 And i had another go with putting a zip in, i think i am getting better and i really like how it blends in with the stripes.
 Piping!

and a corner, i am pleased with these as i was worried i wasn't sewing them right.
Right back to my looooooong to do list.

 And i had another go with putting a zip in, i think i am getting better and i really like how it blends in with the stripes.
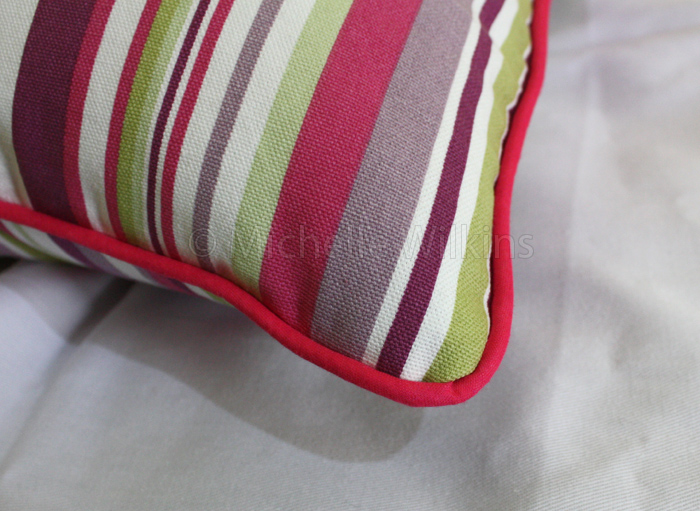
and a corner, i am pleased with these as i was worried i wasn't sewing them right.
Right back to my looooooong to do list.
Wednesday, 28 November 2012
Christmas Cake Earrings
I made two slices of Christmas cake last year to go on my charm bracelet but I never had time to make earrings from them, but this year I have! So now I have 5 different pairs of Christmas earrings to wear in the run up to Christmas!
 Yay Cake!
 These are listed on both my Folksy and Etsy

 Just for fun I wanted to see if this idea of making a Christmas card with buttons would work and I am quite pleased nice and simple but effective I think :)


Thursday, 22 November 2012
Button Wreath Tutorial
This is my first ever tutorial! I had far too much fun making this and i hope you will have fun too.
 The Supplies:
1 Polystyrene wreath, mine measures 18cm
Green felt, any colour of your choice
Pva glue and something to spread it
Glue gun or any type of strong glue like UHU
Various size buttons in Christmas colours (or not, up to you)
Ribbon
and some tools to cut the felt
Time: About 3 hours
 Cut your felt into strips about 2cm wide roughly, my felt here is 45cm long and i cut 7 strips and that was enough to cover my wreath.
 Next pour some pva into a suitable container and then start spreading the glue down a strip of felt.
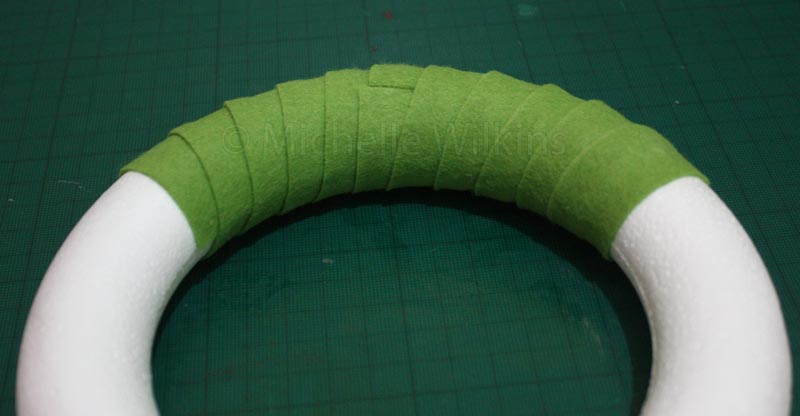
 Then start wrapping your wreath, here i have already put two strips on. It doesn't matter too much about neat ends as we are going to cover it all with buttons!
 Once the wreath is covered with felt its time to heat up the glue gun! Start gluing the buttons on, i put at least two blobs of glue either side of the holes. Bigger buttons i covered the whole of the back as i want them to be secure.
 I organised my buttons so i could easily see all the designs and sizes and that way my wreath has a good variety of buttons.
 All the buttons are now glued on, make sure to keep wiping away any glue spider web things. I have only put buttons on the front as the back won't be seen and will be a waste of buttons.
 Next attach your ribbon or string and make sure to test how it hangs before you commit to gluing it on. My ribbon is quite thick so i wrapped it around the wreath once and then made a loop and glued it into place so that it will always face forward.
 Yum buttons!
I hope I explained everything ok, if you have any questions don't hesitate to ask!

1 Polystyrene wreath, mine measures 18cm
Green felt, any colour of your choice
Pva glue and something to spread it
Glue gun or any type of strong glue like UHU
Various size buttons in Christmas colours (or not, up to you)
Ribbon
and some tools to cut the felt
Time: About 3 hours




I hope I explained everything ok, if you have any questions don't hesitate to ask!
Subscribe to:
Posts (Atom)
